Are you traveling somewhere dangerous where you want the extra protection of a concealed handgun? Do you want to carry concealed but don’t want to drop the cash to get a holster? You don’t have to pay $30-100+ to get a concealed carry holster that works.
Read this guide to find out one of the quickest and cheapest ways on how to make a concealed carry holster that works for you. If you need one in a pinch, our guide can help.
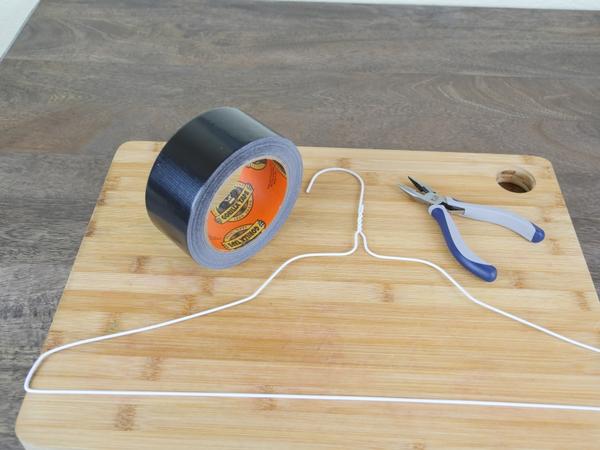
ITEMS NEEDED TO MAKE A CONCEALED CARRY HOLSTER
Coat Hanger – Chances are you already have one of these in your closet. Don’t go through the effort of buying another coat hanger if you already have one. However, the hanger must be metal and the thicker, the better.
Wire Cutters – The wire cutter you use needs to be able to cut through the metal hanger. If you’re handy around the house, you probably already have one. If you need to buy one, we recommend the BOENFU brand because it can be used in many situations.
Pliers – The pliers are used to bend the hanger into the shape discussed below. You probably have one of these as well, but make sure your pliers aren’t the cutting kind. We recommend serrated jaws for a firm grip.
Duct Tape – You know what they say, “If it can’t be fixed with duct tape, you aren’t using enough duct tape.” No at-home project would be complete without a little duct tape. Gorilla makes the classic, durable tape most people use.
STEP BY STEP INSTRUCTIONS
Read on to learn how to make a concealed carry holster. Be sure to follow the directions carefully. We all know how dangerous firearms can be if used carelessly. If you read carefully and watch the video, you’ll be fine.
1) CUT THE HOOK
Grab your wire cutters and get ready to cut off the hook of the hanger. When you cut, go down about two inches from each side where the ends of the hanger meet at the base of the hook. Make sure you squeeze the cutters firmly; you want a clean cut.
2) BEND THE HANGER STRAIGHT AND FOLD IN HALF
Take the hanger and straighten it out with your hands. After that, fold the length of the metal in half. You may not need to use any pliers at this point, but if the metal is thicker than the average hanger, pliers can help apply better pressure.
3) BEND THE FOLDED END
For this step, you need your pliers. Use the tool to bend the folded end one inch. The metal should end up in a “U” shape with the rest of the hanger. Make sure the fold follows the two parallel metal lines you created with Step 2.
4) MEASURE THE BARREL LENGTH
From the edge of the bend in the hanger, measure the length of the barrel and fold again using your pliers. This bend should go in the opposite direction of Step 3. Your end product is an “S” shape with one end being a one-inch bend, a barrel length in the middle, and the rest of the hanger on the end.
5) REMOVE EXTRA WIRE AND TAPE
Measuring the barrel again, this time use your wire cutters to remove the extra wire from the long end of the hanger. You should now have a one-inch bend, barrel length in the middle, and barrel-length end.
Take your duct tape and go around the cut end of the wire 3-4 times. This protects your gun barrel from being scratched by the cut metal.
6) ASSEMBLE AND WEAR
To use your homemade concealed carry holster, insert the taped end of the wire into the barrel of your gun. Turn the gun so it rides perpendicular to the direction of the bends.
Insert the hanger into the waistband of your pants with the one-inch bend looping over your belt. The gun goes between your pants and body. It’s held in place by the wire which is now attached to your pants.
For extra security, add another bend to loop around your belt. This gives your DIY holster better draw speed because the wire is guaranteed to stay in place.
Congrats! You made your concealed carry holster!
COMMONLY ASKED QUESTIONS
Am I allowed to conceal carry? – Most states recognize concealed carry as a constitutional right, but some states also require a permit to do so. State laws vary and change over time. Check with your state police for the most up-to-date information.
You may also want to check out this comprehensive list of concealed carry states and their laws. Keep in mind, if you’re traveling between states you need to be aware of the state’s laws. Otherwise, you are liable.
Why would I want to carry concealed? – There are several reasons to concealed carry. Ultimately, it’s up to you why you do so, but being able to explain your reasons can help to make carrying a handgun less feared.
Reasons include:
- Being prepared to defend yourself and others in an emergency
- Wanting to carry but not make others uncomfortable
- Avoid being a target in a violent situation
- You live or travel in a dangerous area
- You want to practice your rights, so they don’t disappear
How should I dress for concealed carry? – With the concealed carry holster we just made, the hanger clip is going to be visible over your belt. Cover it with a sweater, jacket, or coat to make it completely concealed. Be careful, though. Choosing obvious clothing may make people guess you’re carrying.
CONCLUSION
Thank you for reading our tutorial on how to make a concealed carry holster. Using common materials and tools around the house, you can make your own holster in under five minutes. Remember to check the laws in your state before carrying, but enjoy feeling safer for doing so.
If you enjoyed this article you’ll probably like these: