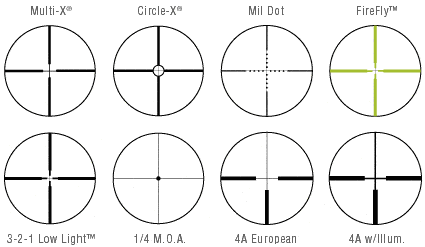
Mil-dot reticles, MOA dot reticles, first plane reticles, second plane reticles, bullet drop compensator reticles, illuminated reticles, dot reticles, duplex reticles, truplex reticles…are you in the scope or reticle market and feeling totally overwhelmed at the ridiculous amount of options?! What does it take to simply line up a shot in your crosshairs and hit a target?!
If you’ve ever felt this way before, you’re not alone, and today we’re going to look at the back-to-basics, no-bells-and-whistles multi-x reticle and how to use a multi-x reticle to quickly and accurately shoot long-range.
RETICLE BASICS
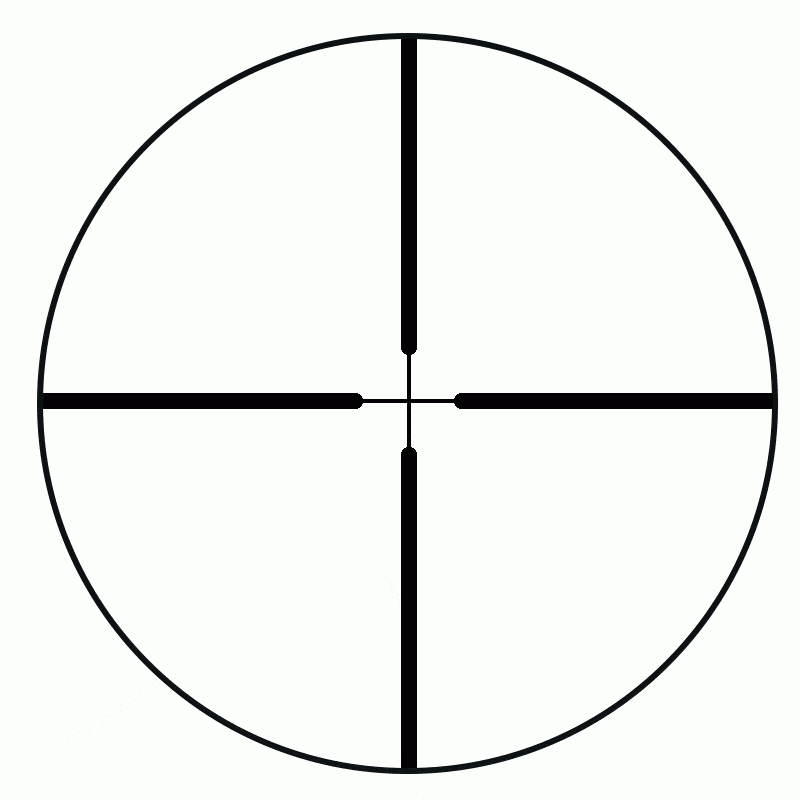
The term “reticle” refers to the fine intersecting lines that create a cross or “X” and give your eyes a more accurate picture of the center of your scope (and where your bullet will go) as you look at your target through your scope.
Reticles can be made with either wires or fibers attached to the lens, or they can be laser-etched onto the lens glass itself (pro-tip: both wire/fiber and laser-etched reticles are great, but the laser-etched ones aren’t ever affected by recoil, so we recommend opting for a laser-etched reticle if you have the chance.)
Fun fact: reticles are often referred to as “crosshairs”, and this nickname came from the original sharpshooters stretching actual horse hairs across the objective lenses of their scopes in the early days of long-range shooting to get a more accurate picture of their aiming point!
We’ve come a long way from that fun period in early rifle hunting history, and there are now a huge plethora of reticle options that can help you account for low light, on-the-spot elevation and windage holdover adjustments, and so on, but one great benefit of multi-x reticles is that their simple design doesn’t clutter your sight picture with too much unnecessary or distracting information.
Multi-x reticles, also known as duplex reticles, are pretty basic and self-explanatory as reticles go: the crosshairs are designed with an initially thicker width to help your eyes find them as you peer through your scope, with the lines narrowing closer to the center so that they don’t obstruct your view of your target.
They are super simple and user-friendly, and another great benefit is that they work with any caliber, load, or grain of round, on both rimfire and centerfire rifles, and on both rifle and pistol scopes.
HOW TO USE A MULTI-X RETICLE
For simplicity’s sake, let’s assume that you’re on the range and aiming your scoped rifle at a typical ‘bullseye’ target 100 yards downrange. As you peer through your scope, focus your reticle dead-on at the exact center of the bullseye.
This point where your crosshairs intersect is known as your “point of aim”, and it refers to where your bullet will ideally hit as you execute your perfect shot with your perfectly calibrated rifle. HOWEVER. If you fire and notice that the “point of impact”–where your bullet lands–is not exactly matched up with the point of aim, you will now have to adjust your scope.
CALIBRATING YOUR SCOPE/RETICLE
Don’t move your gun!!! In fact, it will be extremely beneficial to minimize movement of your weapon by using a gun rest (whether this be a high-tech fancypants tripod or vice system, or simply some old socks filled with sand/rice to anchor your rifle in place.) To compensate for your missed shot, your goal will not be to adjust the bullet up to the bullseye, but instead to adjust the center of your reticle to the point of impact–your missed shot.
Yep! You heard right! While holding your rifle steady in its gun rest and keeping the reticle focused dead-center on the original bullseye, adjust the windage and elevation turrets on your scope so that your crosshairs are re-centered on your missed shot.
Again, DO NOT MOVE YOUR RIFLE (this is known as “holdover” and it is a more advanced style of self-compensation while aiming…and not what you want to be doing right now.) Keep your scope centered on bullseye and adjust your scope turrets until the crosshairs are refocused on your missed shot. Then and only then you can take your second shot. This second shot should hit dead-center in (or very very close to) the middle of your missed shot.
After this, recenter your crosshairs on the original bullseye and take another shot, and you should be hitting right on target! That was a lot of information, so here’s a quick summary guide in list form:
- Fire at bullseye.
- Don’t move the gun.
- Adjust your scope turrets until your crosshairs are aimed at the missed shot.
- Fire at the missed shot (hit!)
- Re-aim and fire at bullseye.
Pro-tip: It’s advisable to take a few shots and make sure you’re getting nice, tight groupings in and around the bullseye just to be sure you’re all good to go, but that’s about it! You can now enjoy using your calibrated and simple setup to quickly line up targets and get shots downrange!
Conclusion
In today’s world, shooters have almost unlimited options when it comes to all the bells and whistles available to equip themselves, their scopes, and their rifles to better make long-distance shots.
However, sometimes it just doesn’t get any better than the tried and true multi-x reticle: with it’s sleek and simple design and no-nonsense, minimalist point-of-view, a multi-x reticle can help you line up a shot with speed and accuracy, without any potentially distracting mil or MOA dot markers or holdover points.
We hope you have enjoyed this article and that we’ve been helpful in teaching you how to use a multi-x reticle to shoot with dead-on accuracy!
If you enjoyed this article you’ll probably like these: