You just fired your rifle and the shot was a bit off, so you adjust your scope and shoot again. Again, the shot is off, so you re-adjust and shoot again. Still off. It seems like it’s moving in the opposite direction. Now you re-adjust the other way and shoot. It’s still off, but now it’s over-extended the bulls-eye. Sound familiar?
Making the correct adjustments to your windage and elevation turrets is a simple matter, and yet if you’re unfamiliar with how they work, can seem like you need a bachelor’s degree just to put your bullet near the center. Let’s get this back to simple by starting at the very basics: elevation. How do you adjust your rifle scope up and down?
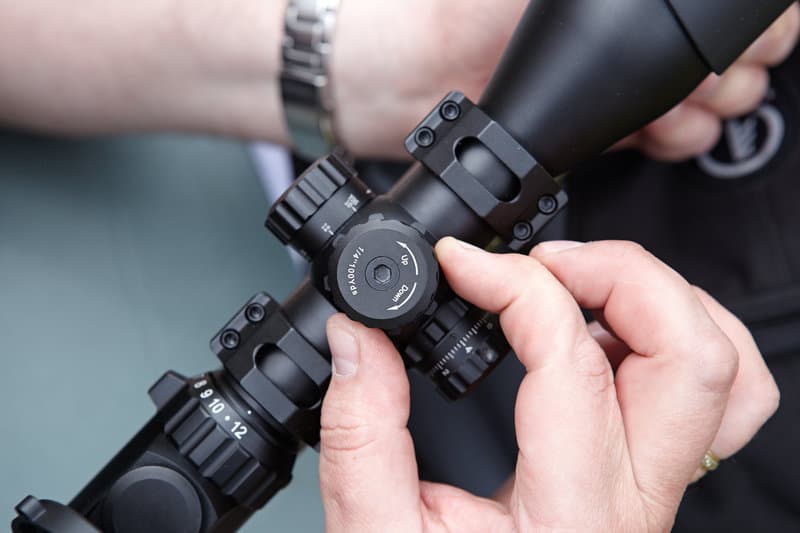
Turrets
Turrets are the adjustment knobs on the top and side or sides of your scope. There is a windage turret, which is the left and right movement, and an elevation turret, which is the up and down movement. Some scopes also have a side focus parallax knob which focuses the reticle.
The elevation turret is situated on top of your scope with the windage turret on the right side. This is convenient placement to help you remember quickly which adjustment is which. Elevation is up, side to side on the side.
Turrets can be tactical style and exposed or covered with a protective cap. The exposed type is easy to adjust as all you need is your fingers to do it. You can easily see exactly where your settings are at every time you look at them. The capped type are better protected, but you need to unscrew the cap to make any adjustments.
Some capped turrets have a little raised dial so you can do all of your adjustments by hand. Most are a screw type, and you need some kind of tool like a penny, screwdriver, or fingernail to make adjustments.
Adjustments
There seems to be some confusion at times as to what it is exactly you are adjusting your knobs to. You are not adjusting the bullet! The bullet is going to come out of the barrel the same way every time. This is your true dead center! You cannot adjust the barrel. It is a fixed part of the gun. What you are moving is the reticle in your scope.
The reticle is the aiming point when you look through the scope. It does not tell the bullet where to go. When you make your adjustments, you are moving the reticle to where the bullet is hitting, so you can tell your eye where the bullet will hit based on how the reticle has been adjusted.
The adjustments on the knobs general will be in either MOA (minutes of angle) or MIL (milliradian), which is just a form of measurement. Personally, I think MOA is more user-friendly. If you see a scope that measures ¼ MOA it means that each adjustment click moves the reticle ¼ inches per 100 yards. Pretty easy to understand. ½ inch for 200 yards, 1 inch for 400 yards and so forth.
MIL adjustments are not the same measurement but are very close. For every ¼ inch MOA click the MIL would be approximately 1/3 inch per 100 yards. MOA is a little more precise, but both are accurate enough. Be sure with either measurement that you are using a scope with a corresponding MOA or MIL dot reticle.
Related Read: How to Sight in a Scope with a Laser Bore Sighter.
Elevation
Now you are ready to adjust your elevation. The elevation turret is the one on the top of your scope. Let’s say you are set up with an MOA adjustment and reticle. Most knobs are marked U for up and D for down with arrows showing you which way to turn the knob.
With an MOA adjustment, you will be adjusting your reticle ¼ inch per 100 yards. If you are sighting in at 100 yards and need to move your reticle up ½ inch, you will turn the knob two clicks in the up direction. If it needs to move down one inch, turn the knob in the down direction 4 clicks. Just a little simple math.
Another good trick for if your turrets do not have the U and D directionals, or if like mine, the directional face plate falls off, is the bolt trick. With this one, you have to be visual. The rule of thumb is righty tighty, lefty loosey. When you tighten (to the right), the bolt screws down. When you loosen (to the left) the bolt screws up. This is this same directional adjustment for your scope. Left clicks (loosening) go up, right clicks (tightening) go down.
The adjustments work the same whether you have exposed turrets or capped ones. The only difference is that capped ones require you to take the cap off, and you will need to use a tool to make the adjustments if they are not finger adjustments. If you have regular capped turrets, always have a penny on you to use as your adjustment tool!
Conclusion
Hopefully, this guide has cleared up any questions about how to adjust your rifle scope up and down. It may take some getting used to, but it’s really very easy once you get the hang of it. If you have a lot of adjusting to do then there is a little bit of math involved, but don’t let that intimidate you! Just add it up like money, in quarters to dollars, or test fire and adjust in small chunks at a time.
As with anything, the best way to get great at this is to practice and practice some more. No matter what you use it for, learn your rifle and learn your scope, and this adjustment thing will become second nature to you, with the added bonus that your aim, confidence, and knowledge will improve. So get out there and keep on shooting!
If you found this article helpful you may also enjoy our guide on how to use a scope or how to reset a scope to factory zero.